Thursday, 4 September 2014
AutoHotkey, create your own shortcuts
Hackers don't like to waste their time and brains.

AutoHotkey allows you to create your own macros and hotkeys.
Opening a website:
#::Run www.google.com
Tuesday, 2 September 2014
Secure Socket Layer Torn Apart [Complete]
SECURE SOCKETS LAYER LEARNING [COMPLETE]
Using only a simple packet sniffer, an attacker can easily intercept data being sent accross the Internet, or even a LAN. As a result, data sent in plain text will surely not remain safe.
Therein lies the need for encryption standards, which allow passage of data from one system to another.
SSL INTRODUCTION
Secure Socket Layer was developed by Netscape, with its main aim to create a secure protocol to ensure that a client and host could communicate or transfer data and information securely.
SSL is what makes secure e-commerce and e-banking possible.
It is important to note that SSL has been succeeded by Transport Layer Security(TLS)
which is quite similar in its working and concepts to its predecessor.
SSL FUNCTIONS
SSL encrypts data at the sender's end and decrypts data at the reciever's end.
Such encryption and decryption of data also ensure that an attacker cannot intercept the data in transit, tamper with it , or even execute Man-In-the-Middle impersonation attacks.
Any tampering done with SSL encrypted data is usually easily detected through built-in checksum tests.
SSL provides for two-way authentication -that is both client's and server's identity are verified.
Another reason behind the widespread use of SSL protocol is that it is application protocol independent and can be used with absolutely any high level protocol.
SSL FEATURES

SSL-encrypted connection : This provides for the secure transaction of encrypted data between the client and the host. This feature of SSL performs the encryption and decryption of the data packets being sent between the client and server.
SSL client authentication : This optional feature allows for verification of the client's identity and prevents identity hijacks, or spoofing attacks. Hence this feature makes it difficult for a malicious attacker to fool the destination system into believing that the attacker system is the client.
SSL server authentication : This allows for verification of server's Certificate Authority (CA), which is the certificate given to the server by companies such as Verisign, Cybertrust,Thwate and others. This SSL feature is a very good countermeasure against phishing attacks.
SSL PROTOCOL COMPONENT
The main SSL protocol is made up of the following two sub-protocols:
SSL Record Protocol : This protocol looks after the transmission of the encrypted data and the format in which it is being transmitted. In addition, it ensures data integrity in the transfer process and also ensures that no data is lost in the transit from the source to destination.
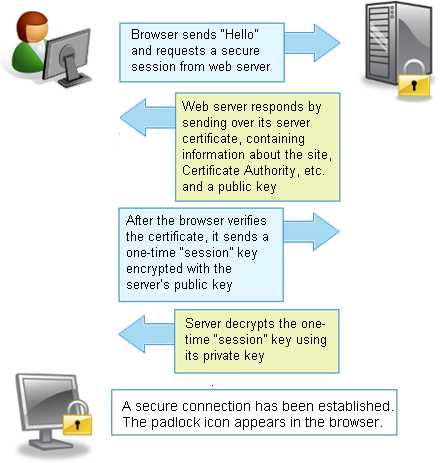
SSL Handshake Protocol: This protocol helps to determine the session key, which is the secret symmetrical key used to encrypt data after a SSL connection has been established between client and the host. Without this protocol, secure communication would not be possible.
DETERMINING WHETHER YOUR CONNECTION IS SECURE
There are several ways to determine whether your connection is safe :
Check your browser's status bar : This is the easiest ways to determine whether your connection is secure. If you see a closed padlock , then the connection is secure, else if the padlock is open or is not visible, the connection with remote server is not secure.
Check your browser's URL box: If the connection is secure , you will see https:// , else you will as http:// in the URL box.
Check for Certificate Authority : To determine whether the page you have visited has a CA, click on URL box as shown in image. Look for the Connection field. This field should normally display the Web site's Certificate Authority. It is important to note that sometimes malicious Web designers can forge a certificate or display a fake one.


A typical SSL transaction involves various encryption algorithms such as RSA, DSS, DES,RC4. It is within these encryption algorithms where the vulnerability of SSL lies.Over the years, it has been proven that SSL is not secure as it seems to be. The problem lies int the fact that the encryption algorithm used along with SSL are not foolproof and can easily be cracked using bruteforce techniques running on a powerful computer. Using this technique , all SSL versions below 3.0 (SSL 1.0 , SSL 2.0) have already been cracked.
However SSL 3.0 with 128 bits, will take a very long time.
168-bit encryption is also available. Note, however that higher encryption levels are not allowed for use outside the US due to national security reasons
That' all much about SSL ,still its a vast topic overall....Hope you understood pretty well about SSL stuff.
If you have any doubts, feel free to comment below
Monday, 1 September 2014
Security Onion
SECURITY ONION
What is Security Onion :
-Security Onion is a Linux distro for IDS (Intrusion Detection and NSM (Network Security Monitoring).
- Developed by Doug Burks.
-Designed to make deploying complex open source tools via a single package.
(Snort, Suricata, Sguil, Snorby, etc.)
- Allows the choice of IDS engine, analyst console, web interfaces.
- Free (Open Source) !!
What in the Onion
Over 60 custom tools
Snort – Signature based IDS
Sguil – Security analyst console
Squert - View HIDS/NIDS alerts and HTTP logs
Snorby - View and annotate IDS alerts
ELSA - Search logs (IDS, Bro and syslog)
Bro - Powerful network analysis framework with highly detailed logs
OSSEC - Monitors local logs, file integrity & rootkits
"Network security monitoring is the collection, analysis, and escalation of indications and warnings to detect and respond to intrusions.“
Installation of Security Onion :
Installation of onion is simple , but takes time to install a pretty bunch of tools within it.
You can find the installation procedure in the below link.
This is the final GUI after an successful installation

Why Security Onion
- A complete set of Network Monitoring linux distro provides a better lookout for the network analysts.
- Since its free, its feasible for the small organization for their network analysis.
- Easy to install and use.
Finally,
Where do we go now
Download/Install
You can find videos for more on Security Onion
Sunday, 31 August 2014
RealVNC, Fast Remote Desktop for LAN
RealVNC, why and how?
The use of computers has greatly increased. It is now necessary for business corporations to keep their networks secure and also easily accessible.
Ease of access is the need of people. We now want everything easily accessible, anywhere and at any time.
We want the photos we captured on our phone right away on our PC. We want to control our computer through our phone. We want to remote control our phone from the PC.
Remote desktop connections have become very important. It is not feasible for computer technicians to roam about and fix problems of people who are techies. Remote desktop connections help solve software related problems without physically visiting to repair.
When it comes to remote desktop, we have many options like Teamviewer, Ammy Admin etc. These are pretty good software programs with nice features. But when these are used on LAN, they lack speed.
These don't work without the internet and even if you are online these programs are pretty slow even if you want to connect on LAN. They turn you to an inefficient computer engineer.
VNC helps you when you are on LAN.
VNC stands for Virtual Network Computing. It is a desktop sharing system that uses Remote Frame Buffer rotocol (RFB) to remotely control another computer.
VNC and RFB are registered trademarks of RealVNC Ltd.
RealVNC is a set of programs that allow you to create and connect VNC servers. It comes in three versions - Free, Personal and Enterprise. The free version does not include file transfer.
To get RealVNC, you must head to RealVNC Downloads. You will se a range of items to download. Download the full package which contains VNC server as well as viewer, for your operating system.
Download it and install the package. Also register on RealVNC.com and get your license key (compulsory for free users also).
After installation, configuration is easy.
Creating a VNC Server
Go to START -> RealVNC -> VNC Server.
You will be presented with something like this:

You can configure your VNC server using the 'More...' button. You can set a password so that there are no unnecessary users.
VNC Viewer users can connect using the given IP address.
Connecting to a VNC Server
Go to START -> RealVNC -> VNC Viewer
You will be presented with something like this:

Connecting is as easy as typing the server's IP addresses and clicking 'Connect'.
That's it enjoy remote desktop connections on LAN.
VNC is as fast as using the host computer itself.
Why to use VNC?
- Faster than other software
- Fast Remote Desktop Connection
- Allows configuring multiple machines from one machine
That's all about VNC. For any queries you can personally contact and ask.
Subscribe to:
Posts (Atom)
-
Admin Page Vulnerability | Hacking Credit Card Here is the second part of Hacking Credit Card . Another easy & worki...
-
 Python Tutorials Part 1 Python is a programming language that is freely available and that makes solving a...
 -
VP-ASP Shopping Cart 5.00 Exploit Here is a small exploit to Hack & Steal Credit card info & many other d...

