Monday, 1 September 2014

Security Onion

                              SECURITY ONION


What is Security Onion :
-Security Onion is a Linux distro for IDS (Intrusion Detection and NSM (Network Security Monitoring).
- Developed by Doug Burks.
-Designed to make deploying complex open source tools via a single package.
(Snort, Suricata, Sguil, Snorby, etc.)
- Allows the choice of IDS engine, analyst console, web interfaces.
- Free (Open Source) !!

What in the Onion 
Over 60 custom tools 
Snort – Signature based IDS 
Sguil – Security analyst console 
Squert - View HIDS/NIDS alerts and HTTP logs 
Snorby - View and annotate IDS alerts 
ELSA - Search logs (IDS, Bro and syslog) 
Bro - Powerful network analysis framework with highly detailed logs 
OSSEC - Monitors local logs, file integrity & rootkits

 "Network security monitoring is the collection, analysis, and escalation of indications and warnings to detect and respond to intrusions.“


Installation of Security Onion :
Installation of onion is simple , but takes time to install a pretty bunch of tools within it. 
You can find the installation procedure in the below link. 
This is the final GUI after an successful installation


Why Security Onion 
- A complete set of Network Monitoring linux distro provides a better lookout for the network analysts.
- Since its free, its feasible for the small organization for their network analysis.
- Easy to install and use.

Finally,
Where do we go now 
Download/Install
You can find videos for more on Security Onion


Sunday, 31 August 2014

RealVNC, Fast Remote Desktop for LAN

 RealVNC, why and how?


The use of computers has greatly increased. It is now necessary for business corporations to keep their networks secure and also easily accessible.
Ease of access is the need of people. We now want everything easily accessible, anywhere and at any time.
We want the photos we captured on our phone right away on our PC. We want to control our computer through our phone. We want to remote control our phone from the PC.

Remote desktop connections have become very important. It is not feasible for computer technicians to roam about and fix problems of people who are techies. Remote desktop connections help solve software related problems without physically visiting to repair.

When it comes to remote desktop, we have many options like Teamviewer, Ammy Admin etc. These are pretty good software programs with nice features. But when these are used on LAN, they lack speed.
These don't work without the internet and even if you are online these programs are pretty slow even if you want to connect on LAN. They turn you to an inefficient computer engineer.


VNC helps you when you are on LAN.
VNC stands for Virtual Network Computing. It is a desktop sharing system that uses Remote Frame Buffer rotocol (RFB) to remotely control another computer.

VNC and RFB are registered trademarks of RealVNC Ltd.

RealVNC is a set of programs that allow you to create and connect VNC servers. It comes in three versions - Free, Personal and Enterprise. The free version does not include file transfer.
To get RealVNC, you must head to RealVNC Downloads. You will se a range of items to download. Download the full package which contains VNC server as well as viewer, for your operating system.
Download it and install the package. Also register on RealVNC.com and get your license key (compulsory for free users also).
After installation, configuration is easy.

Creating a VNC Server

 Go to START -> RealVNC -> VNC Server.
 You will be presented with something like this:


You can configure your VNC server using the 'More...' button. You can set a password so that there are no unnecessary users.
VNC Viewer users can connect using the given IP address.

Connecting to a VNC Server

Go to START -> RealVNC -> VNC Viewer
You will be presented with something like this:


Connecting is as easy as typing the server's IP addresses and clicking 'Connect'.
That's it enjoy remote desktop connections on LAN.
VNC is as fast as using the host computer itself.

Why to use VNC?

  • Faster than other software
  • Fast Remote Desktop Connection
  • Allows configuring multiple machines from one machine

    That's all about VNC. For any queries you can personally contact and ask.

Saturday, 2 August 2014

#1 Java tutorial (Classes and Objects)

Classes and Objects


An object in real life is a combination of properties and actions

An class is a blueprint of various similar objects

To know more clearly about it ....Click this video below


Sunday, 15 June 2014

Avoid sql injection in php with mysqli and prepared statement


AVOID SQL INJECTION IN PHP With MySQLi and PREPARED Statement


To avoid sql injection in php with MySQLi Prepared statement.

Prepared statements in mysqli can easily help to prevent sql injection in php.
There are basically three reasons why you should seriously consider writing prepared statements to execute your queries.

             I.      Prepared statements are more secure.
          II.      Prepared statements have better performance.
       III.      Prepared statements are more convenient to write.
Here is little introduction to mysqli queries and how to use prepared statements use


First let us see how to connect to database using MySQLi 
/*    Create a new mysqli object with database connection parameters   */
       $mysqli = new mysql('localhost', 'username', 'password', 'db');

       if(mysqli_connect_errno())
      {
            echo "Connection Failed: " . mysqli_connect_errno();
            exit();
                  } 

Now let us see Prepared Statement Example
/* Create a prepared statement */
     if($stmt = $mysqli -> prepare("SELECT priv FROM testUsers WHERE username=?
     AND password=?")) {

 /* Bind parameters  s - string, b - boolean, i - int, etc */ 
     $stmt -> bind_param("ss", $user, $pass);

 /* Execute it */
     $stmt -> execute();

 /* Bind results */
     $stmt -> bind_result($result);

 /* Fetch the value */
     $stmt -> fetch();

      echo $user . "'s level of priviledges is " . $result;

 /* Close statement */
      $stmt -> close();
             }

Here first we need to create stmt object before using the prepared statement

// Create statement object
   $stmt = $db->stmt_init();

And then call prepared statement using that stmt object

// Create Prepared statement
    $stmt->prepare();


Stmt prepared statement can directly call at time of prepare statement
// Create prepared statement
$stmt = $db->prepare();


In prepared statement query, need to pass the ? instead of passing the values. as shown in below ex.
               SELECT column1, column2 FROM table WHERE value=?


Now we have to bind the values to that “?” using following bind_param
in bind_param you need to pass value types at first in double quotes.

ex. $stmt->bind_param("s",$name);
$stmt->bind_param("ss",$name,$pass);
different value types are :
i    for integer value
s    for string value
b    for blob values
d    for double values


Now after binding the result need to execute the query
 /* Execute it */
     $stmt -> execute();


To fetch the result u need to call fetch
 /* Fetch the value */
     $stmt -> fetch();


After executing query as you are retrieving the result need to store the result.
 /* Store the Value */
     $stmt -> store_result();

Storing the result means to store the result in memory for retrieval.


After fetching the result need to free the memory
 /* Free the memory */
     $stmt -> free_result();


And need to close the statement
 /* Close stmt statement */
      $stmt -> close();


Prepared Statement Examples


Insert Example

$today = date('Y-m-d h:i:s');      // To create date time stamp
if($stmt1 = $db->prepare("INSERT INTO feedback VALUES(?, ?, ?, ?, ?, ?)"))
{
$null = NULL;
$stmt1->bind_param("isssss",$null,$name,$email,$sub,$comment,$today);
$stmt1->execute();
                        $stmt1->close();
}
Explanation: Prepared statement Insert query is passed and the values which are to be passed are marked with place holder sign. In bind_param() first we have passed the bind type as a string. Then execute it using execute(); Afte execution close the statement.
Select Example

                $searchJob = "SELECT * FROM jobpost WHERE `JobPost_Id` = ?";
                if($stmt1=$db->prepare($searchJob))
                {
                        $stmt1->bind_param("i",$jobid);
                 $stmt1->execute();
                 $stmt1->store_result();
                 $stmt1->bind_result($jobid, $jobtitle, $vacancy, $industryid, $salary,  $description);
                $stmt1->fetch();
                }
               $stmt1->free_result();
               $stmt1->close();
Explanation: First execute the query and store the result into memory and bind that stored result into respective field and remember that all the values should be included in bind_result if you are selecting them with * in select statement the maintain order of field as in database. After binding that filed with fetch() fetch out all the data. At the end free the result so you can save memory and also don't forget to close the statement object.
Update Example

$setActive = "UPDATE employer_detail SET `status` = ? WHERE `empEmail_Id` = ?";
if($stmt1 = $db->prepare($setActive))
{
$statusActive = 1;
$empEmailId = "mukund.topiwala@gmail.com";
$stmt1->bind_param("is", $statusActive, $empEmailId );
$stmt1->execute();
$stmt1->close();
}
Explanation: Here Query stored in Variable and passed it to prepare statement. If the query structure is correct and db object is correct it can be executed. In the bind param first we have passed the bind type in string format and then bind parameter variables. Then we have executed it. At the end we have closed the statement object.

Tuesday, 3 June 2014

Complete Wordpress Security

Complete Wordpress Security

Today , Wordpress has been a commonly used Content Management Systems. Due to its vast features and ease for the users, wordpress has become sophisticated. The wordpress has its own avid plugins and functionilities.

As this cyber world is dangerous,the website hacking has been a common trend for hackers. Wordpress also has been a vulnerable victim for the hackers. Most admins dont  know even their site is vulnerable.

Soo risky right??

So any solutions for the poor wordpress admins (other than coding).

Yes, Wordpress itself came with a complete solutions as a plugin named -'iThemes Security'. The easiest , most effective way to secure Wordpress in seconds.
Wow, so you get to  know, but how to implement it or where to get it.


1. After activation, iThemes Security guides you through important first steps


2.  One-click secure button enables most security features


3. Instantly scan your site and see where you can improve your security with high, medium and low priority items 

So as you see, iThemes Security provides an Complete security for future. So download it, and make your site secure from intruders
For more information, view the above download link and its features.

Thanks Abhishek Tavasalkar,
            Blog:  http://alltechtrix.com/


Thursday, 29 May 2014

Netbios Hacking

Netbios Hacking


THIS NETBIOS HACKING GUIDE WILL TELL YOU ABOUT HACKING REMOTE COMPUTER AND GAINING ACCESS TO IT’S HARD-DISK OR PRINTER.NETBIOS HACK IS THE EASIEST WAY TO BREAK INTO A REMOTE COMPUTER.
STEP-BY-STEP NETBIOS HACKING PROCEDURE
1.Open command prompt
2. In the command prompt use the “net view” command( OR YOU CAN ALSO USE “NB Scanner” OPTION IN “IP-TOOLS” SOFTWARE BY ENTERING RANGE OF IP ADDRESSS.BY THIS METHOD YOU CAN SCAN NUMBER OF COMPUTERS AT A TIME).
Example: C:\>net view file://219.64.55.112/
The above is an example for operation using command prompt.”net view” is one of the netbios command to view the shared resources of the remote computer.Here “219.64.55.112″ is an IP address of remote computer that is to be hacked through Netbios.You have to substitute a vlaid IP address in it’s place.If succeeded a list of HARD-DISK DRIVES & PRINTERS are shown.If not an error message is displayed. So repeat the procedure 2 with a different IP address.
3. After succeeding, use the “net use” command in the command prompt.The “net use” is another netbios command which makes it possible to hack remote drives or printers.
Example-1: C:\>net use D:file://219.64.55.112/FExample-2: C:\>net use G:file://219.64.55.112/SharedDocsExample-3: C:\>net use I: file://219.64.55.112/MyprintNOTE: In Examples 1,2 & 3, D:,G: & I: are the Network Drive Names that are to be created on your computer to access remote computer’s hard-disk.
NOTE: GIVE DRIVE NAMES THAT ARE NOT USED BY ANY OTHER DRIVES INCLUDING HARD-DISK DRIVES,FLOPPY DRIVES AND ROM-DRIVES ON YOUR COMPUTER.THAT IS IF YOU HAVE C: & D: AS HARD DIRVES, A: AS FLOPPY DIVE AND E: AS CD-DRIVE, GIVE F: AS YOUR SHARED DRIVE IN THE COMMAND PROMPT
F:,”SharedDocs” are the names of remote computer’s hard-disk’s drives that you want to hack. “Myprint” is the name of remote computer’s printer.These are displayed after giving “net use” command. “219.64.55.112″ is the IP address of remote computer that you want to hack.
4. After succeeding your computer will give a message that “The command completed successfully“. Once you get the above message you are only one step away from hacking the computer.
Now open “My Computer” you will see a new “Hard-Disk drive”(Shared) with the specified name.You can open it and access remote computer’s Hard-Drive.You can copy files,music,folders etc. from victim’s hard-drive.You can delete/modify data on victim’s hard-drive only if WRITE-ACCESS is enabled on victim’s system.You can access files\folders quickly through “Command Prompt”.
NOTE: If Remote Computer’s Firewall Is Enabled Your Computer Will Not Succeed In Gaining Access To Remote Computer Through Netbios.That is Netbios Hacking Is Not Possible In This Situation.(An Error Message Is Displayed).So Repeat The Procedure 2,3 With Different IP Address.
HAPPY NETBOS HACKING!!

Wednesday, 21 May 2014

The Password Attacks on Kali Linux

The Password Attacks on Kali Linux

This is a part of my article “The Password Attacks on Kali Linux” published on PenTest Magazine.
I have the right to do up to 100 downloads of that magazines, so If you are interested on it you can download PenTest Extra 04_2013 for free using the following link. The only thing you need is a free registration.
PenTest Extra 4_2013
The Password Attacks on Kali Linux [Part 1]
What is the weakest part of the security chain? You know the answer: the one who stand between the keyboard and the desk chair. And what does this user do on her/his first job day? Set a password. Yes, a big part of our security environment lies around that password.
Of course we talk about internal password because Nerwork Administators have well learned the lesson and secure their external accounts with encryption, strong policy, access restriction; in spite of this the internal accounts are the heaven for hackers (and the hell of sysadmins).
Nowadays internal users are, fortunately, low-privileged and some kind of policy forces a little of security, but even if your policy is set with more than 8 characters with numbers, upper and lower case, there will be a user that set as password something like AAAAaaaa1 or Password1.
The complete takeover of a net is a stairway that goes through information gathering, network discovering, password cracking and system owning. Also, finding a low-privilege password is one stair over and it’s actually one of the biggest gap that a penetration tester has to pass. If you find a password, you can quickly test it on other systems and services previously discovered (ssh, ftp, mail): users have the bad routine to use the same keyword for different services.
When you discover a password, you can make an idea about the security company policy and you can try a widespread brute-force attack. If you find, for example, a key of 8 characters, all low case, you can try an attack using this setting on all systems of the LAN. Even if you find a key word from user that isn’t administrator or root there are lot of well-known privilege escalations that can be attempted, especially for old or unpatched system.
Other options that can be used, when you owned a PC with an unprivileged account, are: sniffing traffic,
extracting stored credentials or pivoting other attacks. All these things lead you over and over inthe stairway. In substance, a right association user-password is one of the core success on a pentest and it’s all trusted to an user and his password, that he has chosen on his first job day.
Some terms
Let’s start making a specification. There are two common names you can hear talking about password attack: BruteForce and WordList.
Brute force is when the password is tested using all designated characters, using a set length. The following is an example: use character ‘a’, ‘b’ and set length 2. The password that will be tested are aa, bb, ab and ba; these are 4 tries. You can calculate the amount of attempts: quantity of characters elevated to length used, in this case 2^2=4. Because it is an exponential, it can be become very difficult to test something with ten characters using full ASCII set: according to Password time calculator by lastbit.com this BruteForce attack will take up to 4274902 years.
BruteForce attack, but a WordList one, where what will be used as keys are all single words present in one list.
Note that the password used is exactly the same written in the list. So if in the document there’s the word ‘backup’ only this word will be tested and not ‘Backup’ or ‘back-up’; fortunately there are programs that make these permutations automatically.
So wordlists are often a smarter attempt than a bruteforce attack; in spite of this, during a pen test, you must have a very strong reason to spend hours for this kind of attack.
Of course the following password attacks are done using Kali Linux, because it has every tool you’ll need. Thanks to OffensiveSecurity, Kali Linux, like its father BackTrack, is one of the most used pentesting distributions. If you are reading here you known what we are talking about.
Create your user and password list
To perform a wordlist attack you need, of course, a list of words. There are many techniques to create it, and many places where you can find a precompiled one, but the best way is to create a document based on your needs. From my personal opinion, in this case, is necessary to start from locating valid usernames from the network I‘m testing and using these as a first simple list, trying blank, username as password or very simple passwords.
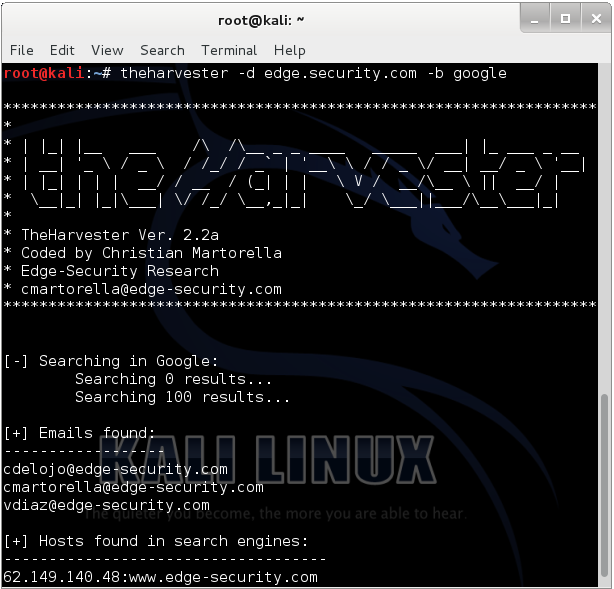
The harvest, by Edge-Security Research, is a very useful tool that helps you by searching for a company name in various resources database (Google, Linkedin, PGP, Bing…) and then extracts for you probable user names. In the Figure 1 you can see the result of a research: maybe vdiaz, cdelojo and cmartorella are also FTP, SSH or RDP users.
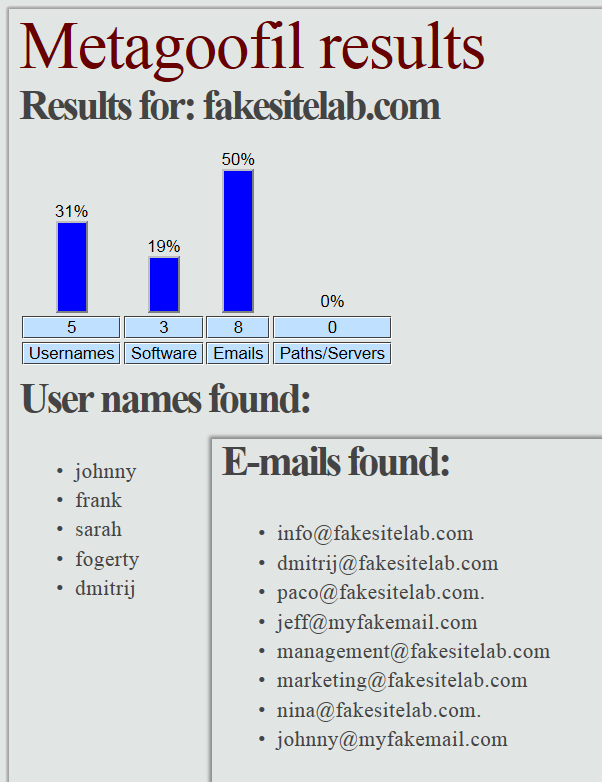
Then you can try to locate some useful accounts from the company website: e-mails and documents such as pdfs, docs or similar can be downloaded to gain such information. You can automate the operation by using another tool by Edge-Security Research: metagoofil (see Figure 2).
TheHarvest is very useful in user discovery
Figure 1
The Metagoofil report
Figure 2
Another way to find usernames, when you are in the testing-Company LAN, is to locate a mail server and an SNMP service. Mail server can be vulnerable to VRFY command and you can use it to probe the system for login names. The VRFY is a licit command and fortunately, in modern system, is disabled to patch this security issue, but sometimes you can still use it. Let’s look how it works using a simple Netcat connection:
root@kali:~# nc -nv mailserver.fakesite.lab 25
(UNKNOWN) [10.0.7.14] 25 (smtp) open
220 mailserver.fakesite.lab ESMTP Sendmail 8.13.7
VRFY freddie
550 5.1.1 freddie... User unknown
VRFY root
250 2.1.5 root <root@fakesite.lab>
VRFY test
550 5.1.1 test... User unknown
If the system is vulnerable, smtp-user-enum program can be used to get some usernames; the following is the basic command to use it:
root@kali:~# smtp-user-enum -M VRFY -U users.txt -t 10.0.7.14
Note that the option -U uses a wordlist in order to find names. If you haven’t one you can find some preloaded in Kali using a command like this:
root@kali:~# find / | grep users.txt
However the suggestion is to keep your list under 100-150 names. Smtp-user-enum can also be used to test the EXPN function; EXPN is similar to VRFY, but it is used on distribution list and it lists all its users. This can be a bigger problem than the VRFY since sites sometimes have an alias such as “all”.
Another way to compile your focused user list is SNMP analysis. SNMP is a protocol based on UTP that is often used to monitor servers’ service status.
The distribution lists (community strings) are passed in clear and often have the default state (public or private), so you can easily try to find it in order to query the server and get many information.
You can use a combination of Onesixtyone and Snmpcheck; the first can be used to enumerate community strings, so, after locking on the hosts with SNMP service, the program can be run.
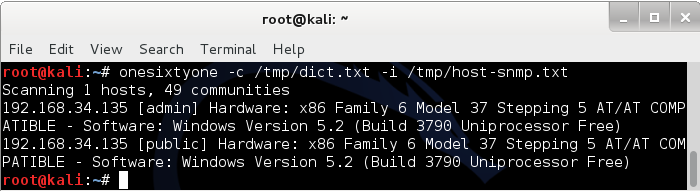
root@kali:~# onesixtyone -c /usr/share/doc/onesixtyone/dict.txt -i /tmp/host-snmp.txt
The dict.txt is a wordlist (another one) of possible community strings and it is already present in Kali; the host-snmp.txt is a file with the IPs of all hosts with the SNMP service active in the network. The word in the square brackets (see Figure 3) is what you are searching for and the next step is to use this word combined to Snmpcheck to extract data from the service.
OneSixtyOne
Figure 3
root@kali:~# snmpcheck -t 192.168.34.135 –c admin | grep -a “User accounts” -A 11
[*] User accounts
-----------------
Administrator
Guest
IUSR_HP-SRV01
IWAM_HP-SRV01
SUPPORT_388945a0
albert
krbtgt
jodie
user
expert
In this example the output is limited to the user accounts (grep -a “User accounts” -A 11), but you can get much more info using SNMP such as processes running, programs installed, open ports, network and routing configurations, storages information and much more.
There are several ways to find a username in the net: if something similar to PC-pedro or Maria’s MacBook is found the assumption is that Pedro and Maria are likely to be usernames that will have access on these computers. It’s important to compile the user list meticulously and add every possible username you find, so you can use it later.
Finally you have a user list that will help you in a first simple password attack.
If you will have no results you’ll wish to make some simple extensions to that list using John the Ripper (JtR) or you’ll try another small wordlist like /usr/share/john/password.lst; also in this case JtR can be used to make some little changes.
Let’s see some usage of John the Ripper password cracker by Openwall. Note that this program does more than what you’ll read here. You will see now, how make some simple mutations in order to upgrade your user list and use it as a password list.
The idea is to create something that leads from an input as ‘root’ to an output like Root, ROOT, rootroot, toor, Root1 and so on. Well, let’s expand a small file (wordlist.lst) with only ‘root’ and ‘password’:
root@kali:~# john -w=wordlist.lst --rules --stdout | tr -s '\n' ' '
words: 100  time: 0:00:00:00 100%  w/s: 10000  current: Passwording
root password Root Password roots passwords root1 password1 Root1 Password1 rootroot toor drowssap 1root 1password ROOT PASSWORD root2 password2 root! password! root3 password3 root7 password7 root9 password9 root5 password5 root4 password4 root8 password8 root6 password6 root0 password0 root. password. root? password? psswrd RootRoot tooR drowssaP Toor Drowssap roottoor rooT passworD 2root 2password 4root 4password Root2 Password2 Root! Password! Root3 Password3 Root9 Password9 Root5 Password5 Root7 Password7 Root4 Password4 Root6 Password6 Root8 Password8 Root. Password. Root? Password? Root0 Password0 3root 3password 7root 7password 9root 9password 5root 5password 6root 6password 8root 8password Roots Passwords rooted passworded rooting passwording Rooted Passworded Rooting Passwordin
In this case a default rule set is used (--rules), but you can modify it using /etc/john/john.conf; note that with 2 words JtR generates 100 words instantly.
The output is normalized, in this case, using tr -s '\n' ' ', but you can remove this part of command and redirect all in a file that fits your needs. Later,
talking about offline attacks, you’ll come across JtR again and you’ll find some other awesome features. Even though, I think, using a huge wordlist is not a good idea, it can be useful to know how to make it, so here are two great tools.
The first is CeWL, you can use it to dig a Company web site to extract words and convert these in a list. The basic usage is very simple and the impact awesome:
cewl www.fakesitelab.com > /tmp/wordlist.txt
You can even use it to extract usernames by pointing CeWL to sites that collect popular birth names. Similarly you can use it to create monothematic wordlists: animals, plants, countries, cars, “Lord of the Rings”, topic words and so on.
The concept I’d like to remark is that in an online password attack you are connected to the LAN: you make network traffic, you stress systems and you can’t stay there all night and day long.
The second tool is Crunch. It can be used to create a word list too, but starts from a different point of view compared with CeWL. Crunch is more like a bruteforce: it generates all words using some parameters you set. Essentially you establish min and max length and a charset (or use the default one); so you can create all possible combinations of characters a, b, c with length from 2 to 4 using the following command:
root@kali:~# crunch 2 4 abc
More specific and interesting usage can be read in the manual page, like the -t option: you can take one word and append some characters to it:
@@god@@@@ where the only the @’s, ,’s, %’s, and
^’s will change.
@ will insert lower case characters
, will insert upper case characters
% will insert numbers
^ will insert symbols
The output can be sent to the screen, to a file, or to another program; this last option allows the use of Chunch directly on an online/offline cracking operation without physically generating a wordlist, saving hard disk space.
Online Password Attack
One of the best tools to complete the online attack is Hydra. This program is tasked to join your lists and to perform the attack over a network service.
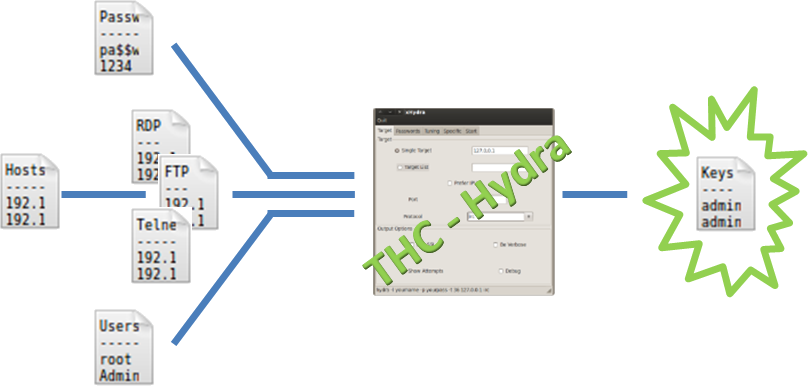
The figure 4 explains how it works: it puts together a username list, a password list and a host list split by services to attack (FTP, RDP, SSH, MySQL…).
Then it starts to try every username and password associations on every hosts. Some other parameters can be set such as proxy or the number of tasks; very useful when attacking some cranky service like RDP.
An operation diagram of the operation of THC-Hydra
Figure 4
The following is the command that performs a wordlist attack against all FTP hosts in the net:
root@kali:~# hydra -s 21 -V -L /tmp/users.txt -P /tmp/passwords.txt -e nsr -t 16 -M /tmp/FTP_hosts.txt ftp
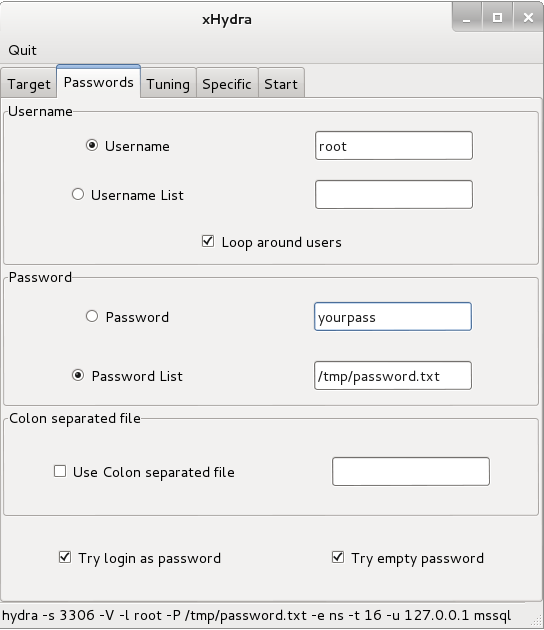
The -L-P and -M options are used to point to the wordlists of users, passwords and hosts and can be replaced by -l-p and a IP to use a single name, password or target. -s is the port to attack and the ftp at the end is the service used as target. -V stands for verbose and -e option tries n null password, s login as pass and/or r reversed login. Finally -t is the number of task that Hydra will use.
The simplest way to learn the use of this tool is to take a look at the GUI xHydra (see Figure 5).
xHydra
Figure 5
Hydra is the end (maybe happy) of the online password attack, but it is no more than a task executor. Its force lies in the wordlists you will be able to create, don’t forget this.

SOURCE : http://www.gosecure.it/blog/art/391/sec/the-password-attacks-on-kali-linux-part-1/

The world have changed a lot, people have changed a lot

To be continued ...